
What I learned Deploying NGINX Proxy Manager
image credit: https://www.blackvoid.club/nginx-proxy-manager/
It was a beautiful morning in Melbourne. I had just gotten up preparing for my day. Today’s task was continuing a front end Vite project and reviewing some content on Data Structures and Algorithms (so, hot right now). When suddenly, a notification from one of my learning adjacent communities, unfurled a chain of events eventuating to the deployment of NGINX Proxy Manager.
Along the journey there were a few moments oh which I felt were worthy to share, not only for those who are discovering the technology for the first time, but for myself also, a place to come back and reference should I need to revise.
Before we start with the basics — throughout this process, Cloudflare as an organisation really stood out for me. It was my first time interacting with their products and I have to say kudos where kudos is due.
I am sure there are some valid criticisms out there, however based on my personal use case, there were stark contrasts compared to the alternatives.
In addition, they do a tremendous job in providing documentation and education on networking related topics (a page taken out of the book of Cisco no doubt.)
What is a proxy Server?
Section titled “What is a proxy Server?”The below image is a great representation of how a proxy server helps collate and add services related to traffic flowing out of a private network.
As an example, this could be a school using web filtering to block access to content, an anonymiser to protect the identity of a user, or even a tool to help circumvent institutional browsing restrictions.
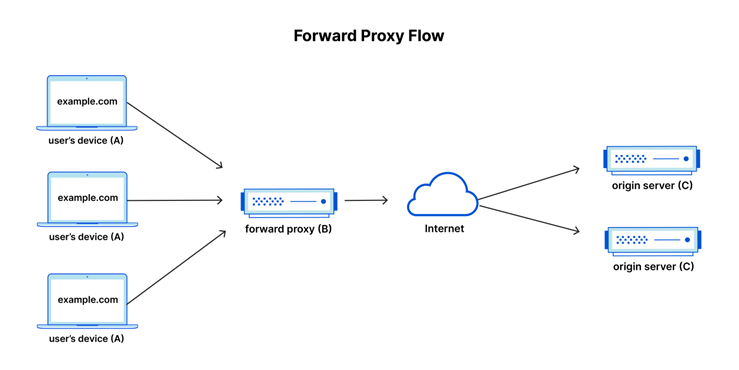
Image Source: https://www.cloudflare.com/en-au/learning/cdn/glossary/reverse-proxy/
“A forward proxy, often called a proxy, proxy server, or web proxy, is a server that sits in front of a group of client machines. When those computers make requests to sites and services on the Internet, the proxy server intercepts those requests and then communicates with web servers on behalf of those clients, like a middleman.” — Source
What is a reverse proxy?
Section titled “What is a reverse proxy?”As you may have guessed, a reverse proxy sits in front of web servers and controls how client requests reach them, rather than controlling outbound client traffic like a forward proxy. (the two are not mutually exclusive and can work in tandem).
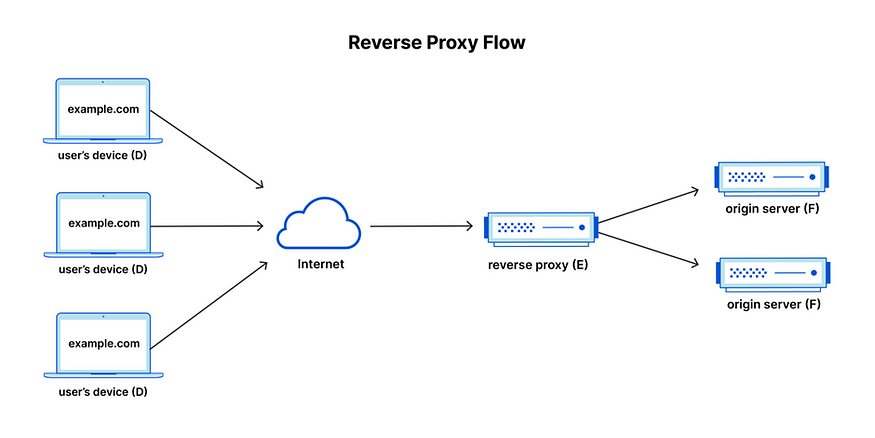
Image Source: https://www.cloudflare.com/en-au/learning/cdn/glossary/reverse-proxy/
“A reverse proxy is a server that sits in front of web servers and forwards client (e.g. web browser) requests to those web servers “ – Source
Why have a reverse proxy can’t you just link directly to a server?
Section titled “Why have a reverse proxy can’t you just link directly to a server?”Reverse proxies are typically implemented to help increase security, performance, and reliability. Yes, you can link directly to a server however this practice comes with many risks including (and not limited to) making it easier for threat actors seek holes in your server’s security.
As the title of this article suggests we are primarily looking at NGINX Proxy Manager — NGINX (Pronounced Engine X [or Ehn Jinx if you are cool like me and mispronounce GIF as well]). Is one of the many unsung heroes of web, helping serve you web content since 2004.
Whilst most of us browse the internet with a Windows device. A lot of the servers are running on open-source Linux based applications and operating systems.
One thing I do want to note, which is important to understanding the nature of proxy managers and effectively can be applied to any application, a mantra I regularly chant for software I’m developing, implementing or running.
“Use the right tool for the right job”
NGINX Proxy Manager is primarily used for web proxy filtering and web traffic. It is not a tool to manage proxies into non web traffic servers (gaming servers as an example) — There are other ways to achieve that.
NGINX is a collection of web server applications which includes reverse proxy, load balancing, caching and HTTPS. Like most things popular and open-source, it has a passionate community of contributors maintaining and managing the repository inspiring over 7,000 forks (potential offshoots) and over 26,000 stars (the GitHub term for likes). It also serves as the core to the NGINX Proxy Manager.
What are the prerequisites (loosely).
Section titled “What are the prerequisites (loosely).”There are a few ways to approach the next steps — so I won’t go into detail, rather I will provide guidance and general advice on how it may work for you.
- Hardware — As the images in the introduction suggest, whether it’s in the public cloud or you are self-hosting. To set up a proxy server effectively you need a minimum of two servers. One acting as your reverse proxy device and one that is hosting your web services/applications. You can technically utilise the same server to run a proxy manager and web apps however this will detract from the security benefits provided.
2. The ability to run Linux on the hardware.
3. Some understanding of Docker technology — will go a long way in simplifying this process. My deployment utilised Docker to deploy a container running NGINX Proxy Manager which had the service up and running in no time. (See docker documentation if you are unsure on what Docker)
4. A domain — that will act as the address to your server.
5. Some (Not necessarily in depth) networking knowledge — At a minimum understanding what purpose IP Addresses, Ports and Firewalls serve and how you could configure those particularly on your host machine.
6. If you are self-hosting — policies you should implement on your host when it comes to tunnelling to your proxy server along side firewall rules, this is very important in managing what is exposed to the rest of your network.
How I implemented the stack to work for me.
Section titled “How I implemented the stack to work for me.”Again the reason I have titled this section this way is because everyone’s configurations will differ slightly, in my scenario I was hosting my proxy manager on a VPS (Virtual Private Server) and pointing it to another VPS. More commonly the manager is used to tunnel to a server that is self-hosted to ensure host IP is obfuscated reducing risk to an administrator’s home network.
Virtual Private Server
Section titled “Virtual Private Server”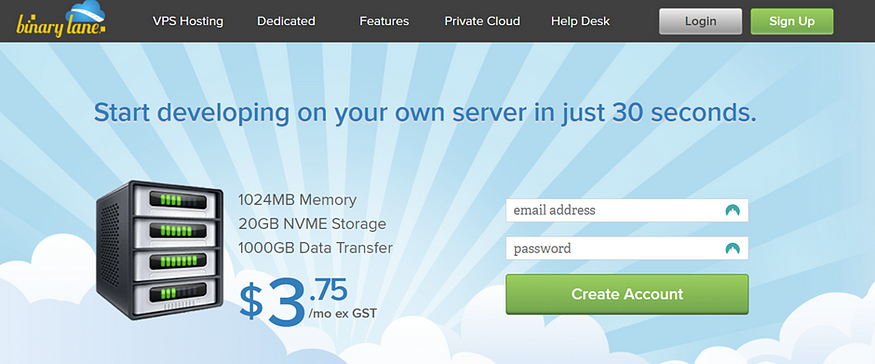
Screenshot of the Binary Lane Website
The first thing I needed was a VPS. This wasn’t my first time requiring such a service and as I am running a developer environment where things aren’t necessarily going to be permanent, I decided to use a great Australian service provider I have used in the past called BinaryLane.
With some of the VPS options starting at $4 a month it’s just a no brainer to me. I’m sure there’s plenty out there this just comes down to personal choice and what features are important for you. As a side note the proxy manager on it’s own has very minimal hardware requirements and can even run on a Raspberry Pi.
Docker
Section titled “Docker”Once our Ubuntu server was up and running in the cloud, we immediately had the option to remotely connect and work on it just like you would a virtual or local server. I ran your regular Linux upgrade, install get commands to ensure everything was up to date and proceeded to install docker as it would be the primary method to install/manage/maintain and deploy images for me.
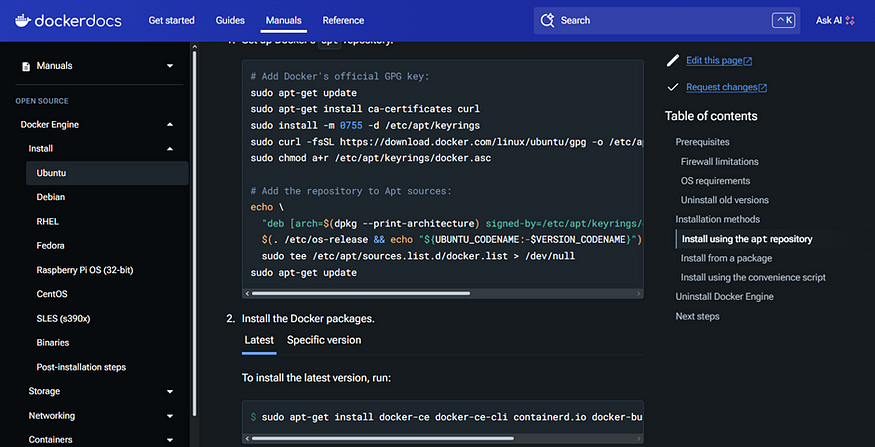
A screenshot of Docker Documenation
From here there are multiple routes available — for those more experienced with Docker following the installation guide for NGINX Proxy Manager should be self-explanatory . That said there is a more guided approach available if the task is daunting.
I know there are plenty of CLI (Command Line Interface) enthusiasts out there that despise the idea of a Graphical User Interface (NeoVIM advocacy intensifies) thankfully there are also developers who understand humans can also process things in layouts and interfaces and sometimes (hear me out), it makes it easier for us to complete/achieve things if they are laid out a certain way.
Portainer
Section titled “Portainer”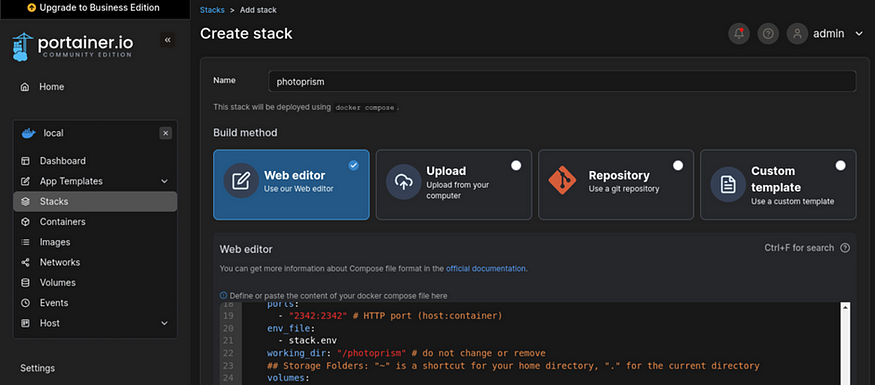
Screenshot of Portainer
Portainer is a tool/Docker application (with a free option available) allowing you to manage/visualise and deploy docker containers through a Web GUI, you deploy it as a docker app and proceed to browse to your serverip:port to complete the setup. From there you can run the rest of your docker experience through the browser with minimal CLI interaction.
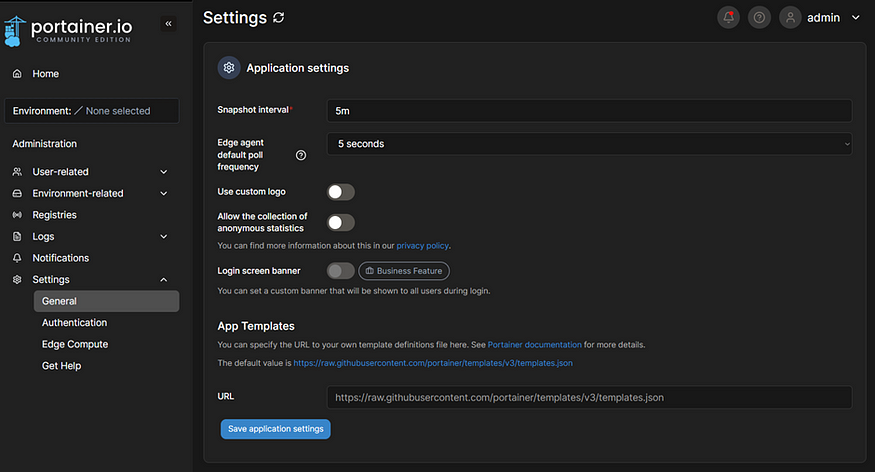
Screenshot of Portainer Settings Where App templates can be found
One of the handy features Portainer brings to the table is the integration of application templates (App Templates) making deploying your containers a breeze. Communities maintain and share beneficial templates, typically as JSON files on GitHub, allowing others to use them.
For my deployment I used the pi-hosted template which can be found here, depending on the version of NGINX Proxy Manager you seek, there may be a need for a different application template that includes your version.

Screenshot of NGINX Proxy Manager v2 with Sqlite in App Templates
Odd Portainer Issue
Section titled “Odd Portainer Issue”Side Note: As with a lot of things which are free and highly customisable I hit an “odd” issue here — depending on when you are reading this either this method is outdated, or the issue has been resolved.
That said using the above JSON (and in general any other JSON I tried) I found that there was a visual glitch which re renders my search results rather than letting me proceed with the deployment of the container — the band aid solution to this is.
1. Ensure your search results are correct, and your required container is displayed.
2. Go back to your app settings and modify your JSON address slightly (I just changed v2 to v3). This technically is not a real file from what I have gathered it removes the polling to render the app list.
3. Return to your search results and you should be able to click through to deploy container.
Final Menu for Deployment
Section titled “Final Menu for Deployment”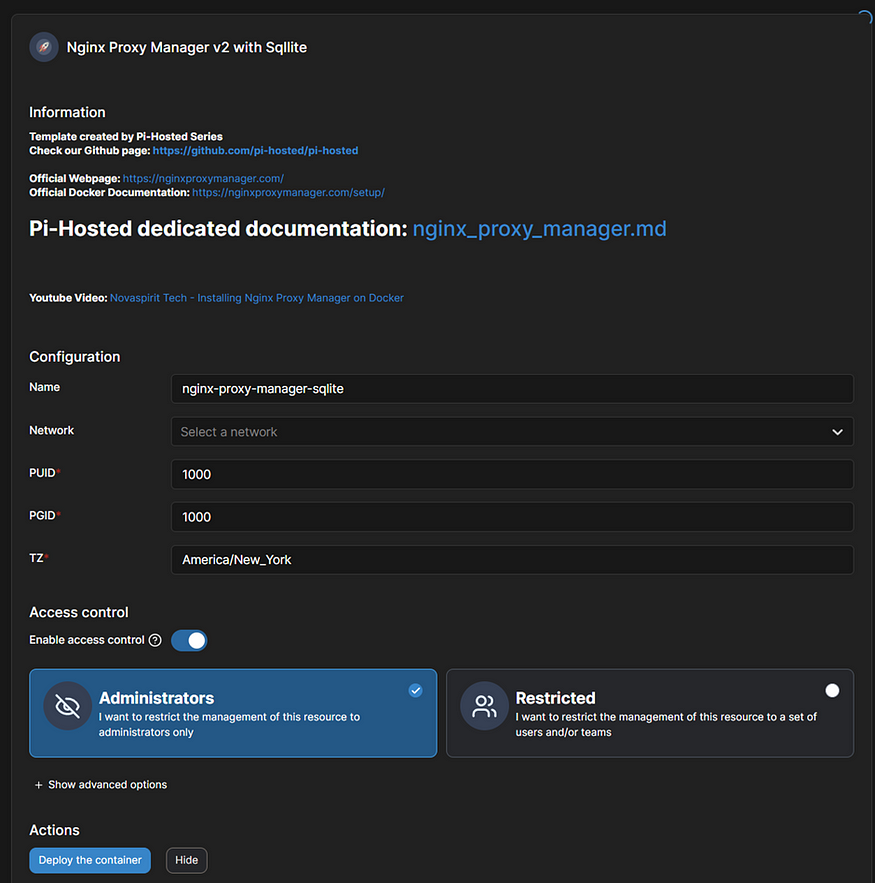
Screenshot of a Container Ready to install in Portainer
From here you are free to deploy the proxy manager accordingly — ensure to select the correct network when deploying. By default, the container is deployed to ports 443, 80 and 81.
Finalising NGINX Proxy Manager Installation
Section titled “Finalising NGINX Proxy Manager Installation”You will now have access to your NGINX Proxy Manager through a Web GUI on port 81 (if you are using default ports). Your initial login will be set to the default of
Email: [email protected]
password: changeme
The first login will prompt you to change these settings immediately.
Domain Management (Cloudflare)
Section titled “Domain Management (Cloudflare)”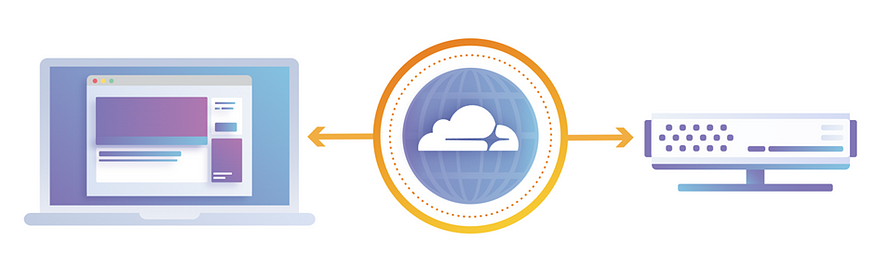
Image Source: cloudflare.com
Here is where our path’s may split — My scenario required me to take some additional steps to move my name servers to Cloudflare yours could be different.
If for some reason you are having trouble with your domain name service provider, whether it’s revoked access to API’s (issue I had) or something else. The good news is Cloudflare at its free tier gives you everything you need to do this step.
The domain itself is of course going to be pointed to your proxy manager. The Domain Name System (DNS) layer provided is critical to ensuring you can resolve to these services with a layer of security through the browser (Secure Sockets Layer — SSL). Yes I know it’s TLS now, trying to keep it simple.
NGINX Proxy Manager creates and authorises these SSL certificates through a service called Let’s Encrypt and if your DNS provider allows it, you can automatically update those certificates without the need to manually intervene. This would be through an application programming interface (API) managed by the provider.
Why automate? — for arguments sake let’s say your domain is foo.com, browsing to this page resolves to a basic home page running on a standard web server you are hosting.
You decide to run another web server for your blog but now you need an address to point to that server.
If the environment is setup correctly you will have the ability to make browsing to multiple routes predictable utilising an automated system that creates subdomains (blog.foo.com as an example), generates SSL certificates and manages those for the life of the configuration — steps that would be extremely tedious to manage on a regular basis as your infrastructure/services grow and change.
So, what did I do with Cloudflare?
Section titled “So, what did I do with Cloudflare?”As mentioned, I quickly realised I needed to move my nameservers to Cloudflare as I had an issue with the original provider revoking access to API’s (needed for certificate automation).
I made an account, selected the free tier and used an automated service to transfer the existing DNS records across. In my scenario I needed to update the name servers to Cloudflare for the transfer to take place. (the wizard they provide is self-explanatory).
From here there are two DNS Records I was primarily interested in — again this may be different for you.
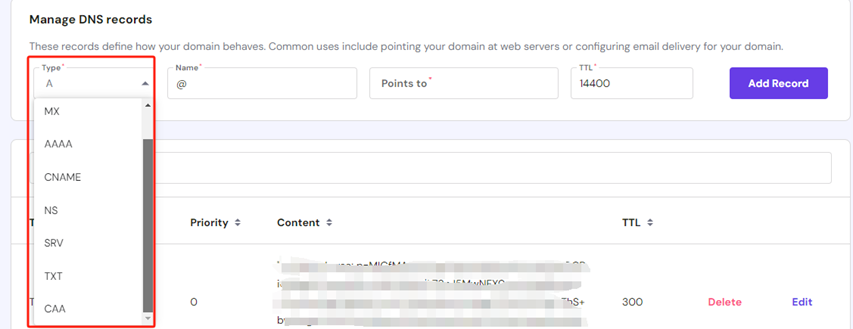
A screenshot of the cloudflare DNS Record Management System
A Record — A stands for Address and is the most fundamental type of DNS it contains the IP address of a given domain. example, if you pull the DNS records of cloudflare.com, the A record currently returns an IP address of 104.17.210.9 (Note: A records only hold IPV4 Addresses for IPV6 you need AAAA).
CNAME Record — CNAME stands for canonical name in short these are used as an alias and commonly provided as a record for a sub domain.
Additional note in DNS records to consider — naming conventions utilise the ***** character as a wildcard helping route anything that might be utilised as input in place. In the below example we use the wildcard to cover sub domains.
I have put together a table further explaining how this can be implemented:
Example Domain: foo.com
With the below DNS Records including the wildcard for the second CNAME.

Example DNS Table
We would reroute any subdomain.foo.com alongside the foo.com domain itself to the IP Address of our reverse proxy server thus having all traffic to that address now managed by our reverse proxy server.
Quick Side Rant (API Related)
Section titled “Quick Side Rant (API Related)”
Image Source: https://www.behance.net/gallery/10500093/Dinosaur-Car-Named-Dinobeelte
One of the things I have become a lot more appreciative of is organisations that don’t maximise their profits at the cost of those who make their products more desirable. I’ll give you an example.
Let’s make up a fictitious car make and model for this analogy. The Hundord Raploster — (why not) — and let’s say the Raploster on launch had an average at best reception.
One day, a group of clever engineers realised that the Raploster had a system or mechanism that if modified, could save the average consumer half a tank of fuel every week. They build this system — believe in a philosophy that allows everyone to have access to this great technology and push it out there for people to improve on modify and use.
Hundord in it’s great wisdom sees a potential to maximise profits, the next iteration of the car now has a padlock on the mechanism that allows for you to implement this modification, They advise Raploster owners that the padlock can only be unlocked with a key magically provided by Hundord (With the payments usually being a subscription model in which Hundlord can change the padlock and make you pay more for different tiers of padlock keys!).
I think the analogy should resonate with now — simply put, don’t alienate a community of enthusiasts who make your product better for small profit gains. These communites grow demand, trust and market presence. Alienating them means losing sales as they will go straight to your competitor and give them the free hype and expertise.
On that note…
Cloudflare API (and Certbot)
Section titled “Cloudflare API (and Certbot)”
Screenshot of the Cloudflare API Menu
Yes, the Cloudflare API is available to use on the free tier. It’s super simple to setup and through a few clicks you can get your API key. You can also segregate your keys to ensure interfaces are only accessible to the zones you have approved should you have multiple zones being managed.
This will serve as the interface between your proxy server and Cloudflare.
NGINX Proxy Manager
Section titled “NGINX Proxy Manager”A quick reminder before we continue: As mentioned the reverse proxy method is one of many ways to add a security layer between your server and client. It does not replace other techniques such as firewall management and traffic segregation, a robust security strategy must always be considered on the host itself — food for thought when you have nodes publicly accessible.
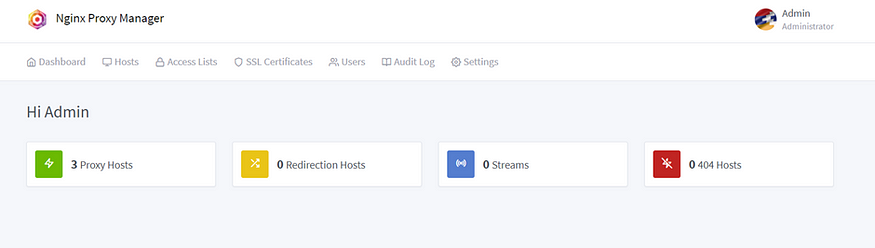
Screenshot of the NGINX Proxy manager homepage
And with that lets return to NGINX Proxy Manager ready to finalise our routes. This journey is near its completion and if you have made it this far the good news is the last few steps are simple.
This is in no way an in-depth guide to the dashboard or the various options available, my use case was a simple redirect. That said, there are plenty of features you can explore outside of this context highly useful for different scenarios.
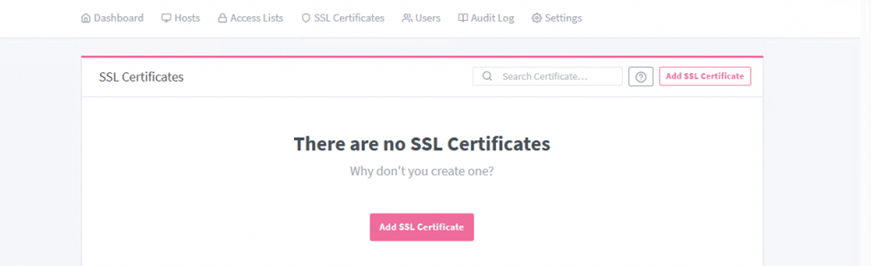
Screenshot of NGINX Proxy Manager SSL Certificates Page
The first step to take was to ensure we had SSL Certifications set up with Let’s Encrypt alongside a valid connection to our Cloudflare API — by now we have a key and all relevant details ready to go.
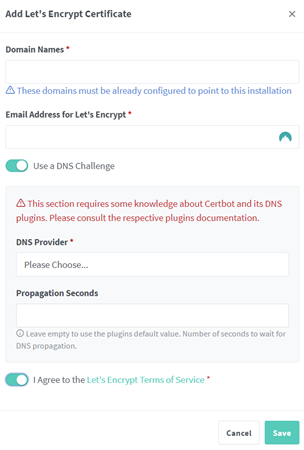
Screenshot for adding Encryption Certificates
The menu presented asks for your domains, a valid email alongside your DNS provider (in our case Cloudflare). For the domain field it is important to include both base domain (foo.com) along with your wildcard domain (*.foo.com) you must press enter after typing each domain.
I will say the UI experience is not overly intuitive the first time you use it, so these small mistakes are likely to happen.
Once you have completed this step and everything is green on your dashboard. You can now navigate to your base domain, and it should return a congratulations page with a valid SSL certificate.
The contents of this page do acknowledge that the domain points to a proxy server. This might not be something you want to advertise, thankfully within the dashboard you can change the default site through the settings tab — if setup correctly any non-routed sub domain would redirect to this default site.
Now that certifications are checked off we are ready to route some hosts!
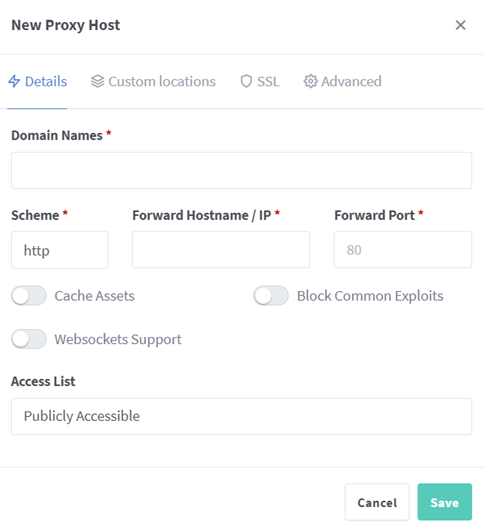
Screenshot of proxy host popup
Head on over to your Hosts Tab>Proxy Hosts and hit the Add Proxy Host button — from here you can assign the following settings:
· A domain or subdomain — for example blog.foo.com (don’t forget to hit enter).
· The forward hostname — Address to your hosted server.
· Scheme of your host — HTTP or HTTPS.
· Security Settings provided through NGINX Proxy Manager around exploits and websockets.
· Access Lists — Restrict who can access the host.
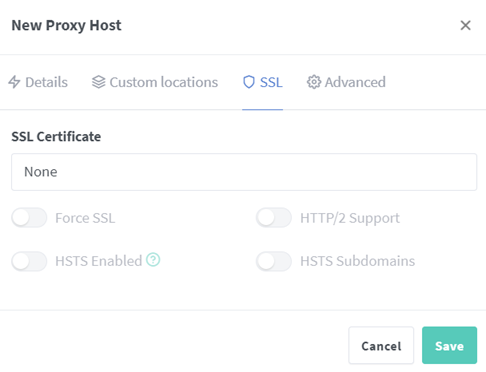
Additionally SSL is important to configure (found in the pop up upper tabs) to avoid browser presented errors — Here you can assign your generated SSL certificate to your domain/subdomain
🎉**And with that final step completed and the save button clicked, your host should now have a reverse proxy address that can be accessed in accordance with how you have set it up!**🎉